Airbus A320 N1 Gauge Lever Position Blue Circle
A320 Startup from Cold And Dark
Aerofly FS features a full cold and dark startup simulation of the Airbus A320-200 and also all other airliners in the latest versions.
The term "cold and dark" refers to an aircraft which has been parked for a while and is prepared for the first flight of the day. The engines are off and all systems are powered down.
To select the cold and dark setting first select the aircraft in the aircraft menu and then select a parking position using the location menu. After selecting a parking position you will see options for "ready for taxi", "before engine start" and "cold and dark". Select the latter to start with all engines and systems off.
We'll skip some processes to keep this tutorial short and needles to say this is not to be used for real world flights.
Cockpit Preparation and Preflight
Power On
The A320 is normally powered by the two engine generators during flight. When the engines are not running an Auxiliary Power Unit (APU) in the rear of the aircraft can be used to provide power. On the ground when the aircraft is parked we can also connect an external power generator to the power inlet on the outside. If all generators fail during flight a ram air turbine (RAT) automatically deploys and is driven by the airstream to provide essential power. Lastly the A320 has two batteries that provide DC power for APU start.
Upon entering the flight deck:
- Check that the wipers and weather radar are turned off
- Check that the landing gear lever is down, engine master switches are off and engine mode selector is normal
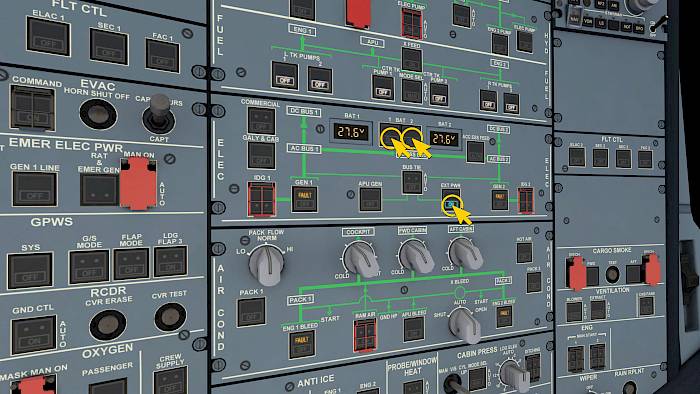
- Check Battery Voltage greater than 25.5V
- Push BAT 1 and BAT 2 pushbuttons to turn both batteries on which will give us basic DC power
- When the EXT PWR pushbutton shows a green AVAIL text push it to use the external AC power for the flight deck screens
Start APU
- Push and hold the APU fire test pushbutton in the upper part of the overhead panel. This triggers the fire test which illuminates the APU fire button, fire extinguisher button and show a red ECAM master warning and APU FIRE ECAM action. Release the button again
- Push the APU MASTER SW pushbutton
- Wait for a few seconds for the APU for the APU self test to complete and inlet door to open, which you can monitor on the APU page in the lower ECAM
- Push the APU START pushbutton to start the APU
- When the APU has started the START button shows a green AVAIL light and the upper ECAM shows an APU AVAIL memo in the right column
- Turn on the APU BLEED when the APU is available
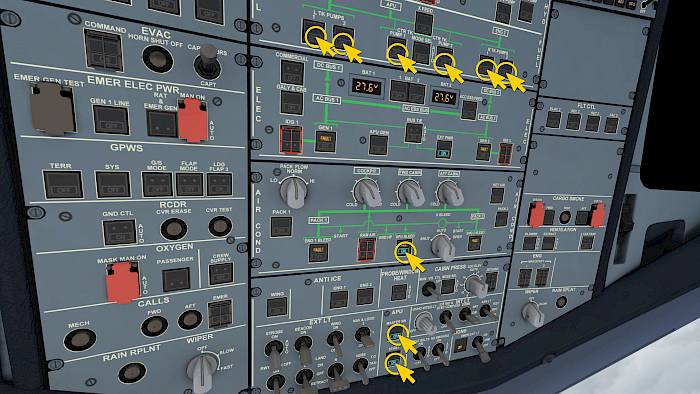
- Check that both air conditioning packs are turned on with the PACK 1 and PACK 2 buttons
- Turn on all fuel pumps by pressing the L TK PUMP 1 and 2, CTR TK 1 and 2, and R TK PUMP 1 and 2 buttons
- Check that no white lights are remaining in the overhead panel

ADIRS and Signs
- Set all three ADIRS switches to the NAV position to start the alignment process
In the real world this can take 10 minutes or more, we've sped this up for you to just one minute. The A320 comes with two sets of navigation lights to allow continued line operation even when a single light bulb fails
- Turn on the first set of navigation light by placing the NAV & LOGO light switch to the "1" position.
- Arm the passenger emergency exit lights by setting the EMER EXIT LT to the center ARM position
- Set the SEAT BELTS and NO SMOKING switches to AUTO
In our A320 the company decided to keep the no smoking signs on at all times and instead the no smoking switch is used to signal the use of personal electronic devices.
Additional Checks (optional)
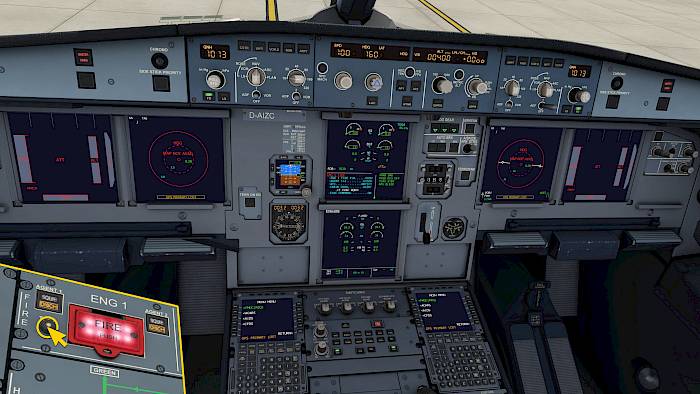
We can perform an engine fire test for ENG 1 and then ENG 2 by pressing and holding the TEST button in the upper part of the overhead panel. You should see the engine fire button light up red, the two fire extinguisher buttons illuminate and you should see and hear a red master warning, a red engine fire message on the ECAM as well as a red FIRE text on the engine master switch
- Press and hold the ENG 1 fire test button, then repeat for ENG 2
- Check that the flap lever is at the indicated flap position
- Check that the speed brake lever is retracted
- Check that the parking brake is on
- Check the brake accumulator pressure is sufficient to hold the parking brake on
- Open the ECAM engine page and check the engine oil quantity
- Check the ECAM hydraulic oil quantity
- Check the ECAM oxygen pressure
- Check the ECAM status page
- Press the ECAM recall button to display any previously cautions and warnings

Before Start
We're now entering the minimum necessary values into the MCDU.
- Set the ZWF and ZFWCG as well as the BLOCK FUEL mass on the INIT B page
- On the performance takeoff page insert the V1, VR and V2 speeds and takeoff flaps
If you want to you can preform a full MCDU preflight as described in our dedicated A320 MCDU tutorial
A320 MCDU Preflight
After MCDU preflight has been completed continue with before start checklist:
- Set the BEACON light switch to on
- Display the default ECAM page by pressing the manually selected ECAM page button or by pressing the CLR button if they are highlighted in green
- Check that all fuel pumps are on, that the APU is running and that APU BLEED is turned on
- Check that all doors are closed. Open the ECAM DOORS page and click on any doors that are still open. After a while the label will change from amber to white to show the door closed and slide armed

Prepare Autopilot for Depature
- Turn the flight director on by pushing the F/D button on the captain and first officer side. The F/D buttons will show a green highlight when the F/D is on
- Set the initial climb altitude by rotating the autopilot selected altitude, we'll already set the cruise altitude of 35000ft now
The autopilot flight control unit (FCU) should now show a dot and three dashes for the airspeed and heading and dashes for the vertical speed. If the speed or heading don't show this you can normally push the knob to set the managed mode (*—).
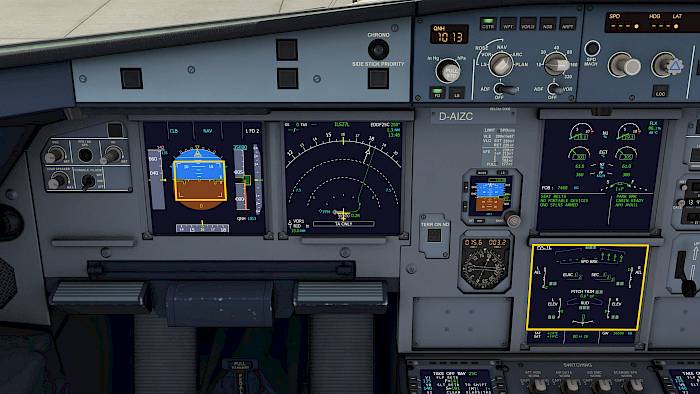
The primary flight display (PFD) shows the active and armed thrust, lateral and vertical modes on the flight mode annunciator (FMA) section at the top. The FMA columnds should now show
- Blank
- ALT or CLB in blue
- Blank or NAV in blue
- Blank
- 1 FD 2
Engine Start and After Start Checks

Engine Start
With the APU running and APU BLEED and all fuel pumps on, parking brake set and beacon light on we can now commence with the engine start. Start sequence is right engine #2 first, then left engine #1.
- Set the engine mode selector to IGN/START
- Move the ENG2 master switch from OFF to ON
The full authority digital engine controller (FADEC) now automatically starts the engine. The lower ECAM displays the engine page and we can see the air starter valve open and ignition A or B being used for the engine start. The engine core N2 and engine fan N1 rotation speeds are rising and the fuel flow (FF) and exhaust gas temperature (EGT) is increasing. When the engine is started successfully a green AVAIL text is displayed above the engine N1 indication.
- Repeat the process for the engine #1
- When engine #1 also displays a green AVAIL indication on the upper ECAM set the engine mode selector back to NORMAL
After Start
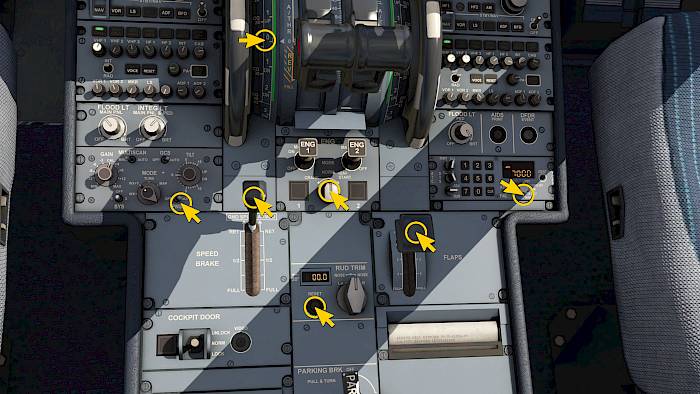
- Engine mode selector NORMAL
- Arm the ground spoilers by pulling the speed brake lever forward until the white stripe appears. You can also tap the lever briefly for this
- Set the flaps to the takeoff position, in our case flaps 1. The aircraft extends slats and flaps to the takeoff position and the ECAM displays 1+F
- Center the rudder trim by pushing the button next to the rudder trim switch
- Set the pitch trim to the takeoff setting. In our case UP 0.0 units
- Turn on the predictive wind shear system (PWS) on the weather radar panel
- Set the transponder to TA/RA
- Turn the APU BLEED off by pushing the APU BLEED pushbutton
- Turn the APU off by pushing the APU master switch. After a cooldown phase the APU will spool down
- If the external power is still in use turn if off now
- Push the ECAM recall (RCL) button and check the STATUS page
Flight Control Check
Let's perform the flight control check. As soon as you deflect any of the control inputs the lower ECAM page automatically displays the flight control page for you.
- Push the side stick fully forward then full aft
The cross hair on the PFD should move down to the full down position, the flight control page should show both elevators at the full down position when you push the stick and full up position when you pull up.
- Side stick full left, then full right
PFD cross hair goes to full left, ECAM shows left aileron full up, right aileron full down. The four left roll spoilers should indicate their deflection with a green arrow each. The image is mirrored image for the full right deflection.
- Rudder full left, full rudder right
- If you are performing this test while rolling hold down the pedal disconnect button on the tiller to disable nose wheel steering during this test
The flight control page should show the rudder deflections.
Taxi

Before Taxi And Brake Check
- Set the nose light switch to TAXI
- Turn on the runway turnoff lights
- Release the parking brake
The aircraft is usually able to accelerate with idle thrust. If you are going uphill you might need to add a bit of thrust to start rolling.
- A low speed test the wheel brakes and check that the brake accumulator pressure gauge indicates zero pressure
- After the brakes are tested arm the autobrake rejected takeoff function by pressing the AUTO BRK RTO pushbutton

ECAM Takeoff Checklist
Two minutes after the engine start the ECAM will show the takeoff checklist for us. You can also request it earlier by pushing the ECAM T.O CONFIG pushbutton.
- Press the T.O CONFIG pushbutton to display the checklist
- No remaining items should be visible. If the line T.O CONFIG is still highlighted in blue then push the T.O CONFIG pushbutton again
If the ECAM displays red warnings push the master caution button in the glareshield to cancel the warning. Check the error message and correct it or press the ECAM CLR buttons to remove them.

Before Takeoff
When entering the runway
- Turn on the strobe light
- Turn on both landing light switches
- Set the nose wheel light switch to T.O
- Received CABIN READY memo on the ECAM
We are now ready for departure.
Note - You can return to this state or skip all of the steps above by just selecting the runway position in the location menu.
Takeoff

Set Takeoff Thrust
Initiate the takeoff by moving the thrust levers to the mid range 50% N1 position. After both engines have spooled up to this intermediate power setting release the brakes and set the thrust levers to the FLX/MCT detent.
- Move the thrust levers to about 28% of the range to set 50% N1 and let both engines stabilize at that value
- Release brakes if you haven't done so
- Set flexible takeoff thrust (FLX) by moving the thrust levers to about 77%
- Hold about 1/4 to 1/3 of nose down elevator input until you reach 100 knots. This improves directional stability until the rudder becomes effective
Takeoff Roll
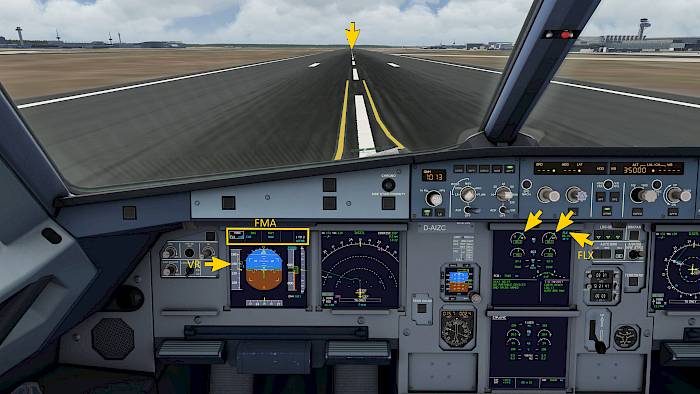
The PFD flight mode annunciator (FMA) will now engage the speed reference system (SRS) takeoff mode and the thrust mode will change to MAN FLX xx. The flight directors will turn on and will indicate pitch commands for after lift off. Ignore these until you reach rotation speed VR.
- If needed more thrust you can move the thrust levers to the TO/GA position
- Maintain the runway centerline with rudder inputs
- Aileron crosswind corrections are usually not needed because this is a full fly by wire aircraft and this is also simulated to full extent

Takeoff Rotation
When the airspeed passes though our rotation speed, indicated by a small cyan circle on the airspeed tape, we can pitch up to lift off.
- Gently pull back on the stick with about 20% of nose up input indicated on the PFD
- After lift off follow the flight director SRS commands and establish a pitch of about 15 to 18 degrees.
- Retract the landing gear when the vertical speed indicator indicates a positive rate
- Maintain an airspeed of about V2 + 20 knots
After Takeoff
After passing the acceleration height about 1000 feet above the runway the flight mode annunciator (FMA) will show a white "LVR CLB" blinking text. This asks you to move the thrust levers to about 58% into the CLB detent. Auto-Thrust (A/THR) will then engage and either command climb thrust (THR CLB) or maintain SPEED. You can force the thrust mode into SPEED hold by pulling the vertical speed knob out. A/THR will then change thrust to acquire the target speed.
- Move thrust levers to CLB
- When you are faster than the -S speed you can retract the flaps
- Disarm the ground spoilers by clicking the speed brake lever
- Turn off the lights as needed
- Turn off the seat belt signs when possible
Have a good flight!
Autopilot Tutorial
Discover the advanced features of the autopilot in the A320 in this tutorial on Airbus autopilots.
Airbus Autopilot Tutorial
MCDU Tutorial
Check out our dedicated MCDU tutorial to learn how to enter a flight plan using the MCDU in the Aerofly FS A320.
A320 MCDU Programming
Source: https://www.aerofly.com/tutorials/a320-startup-from-cold-and-dark/
0 Response to "Airbus A320 N1 Gauge Lever Position Blue Circle"
Post a Comment